
GENSO Maker (Test Version) User Manual
-
GENSO Maker (Test Version) User Manual
※ Please be aware that there may be changes in operation methods and the save data compatibility may be lost without prior notice during public release.
※ The LAND data edited in the test version cannot be carried over to the official version.
※ The GENSO Maker test version is available for use by ALL users, including those who do not own LAND plot.
[System Requirements]
■ Supported platform:PC(Windows, Mac) ※Windows10 or above
■ Browser:Google Chrome
*Although Edge, Safari, and other browsers are also compatible, we recommend using Google Chrome for better performance and fewer issues such as slow response times.
■ Language:English, Traditional Chinese and Japanese
■ Eligibility: Anyone with the above-mentioned supported platform can use the trial version of GENSO Maker.
[Play Range]
・Feature to switch between four types of Trial Maps (exclusive to the test version)
・Feature to freely place objects within each Trial Map
・Feature to set music that plays within the Trial Map
・Snapshot feature
※ Note: All data is exclusive to the test version and will not be carried over to the official version.
※ Note: The Importing NFTs feature is not available in the test version.
[Language]
You can change the display language by selecting "Language" in the "Options" menu and clicking "Confirm."
The available language options are English, Traditional Chinese and Japanese.
After switching to "Traditional Chinese", please restart your browser to ensure that the content is displayed correctly.
[About saved data]
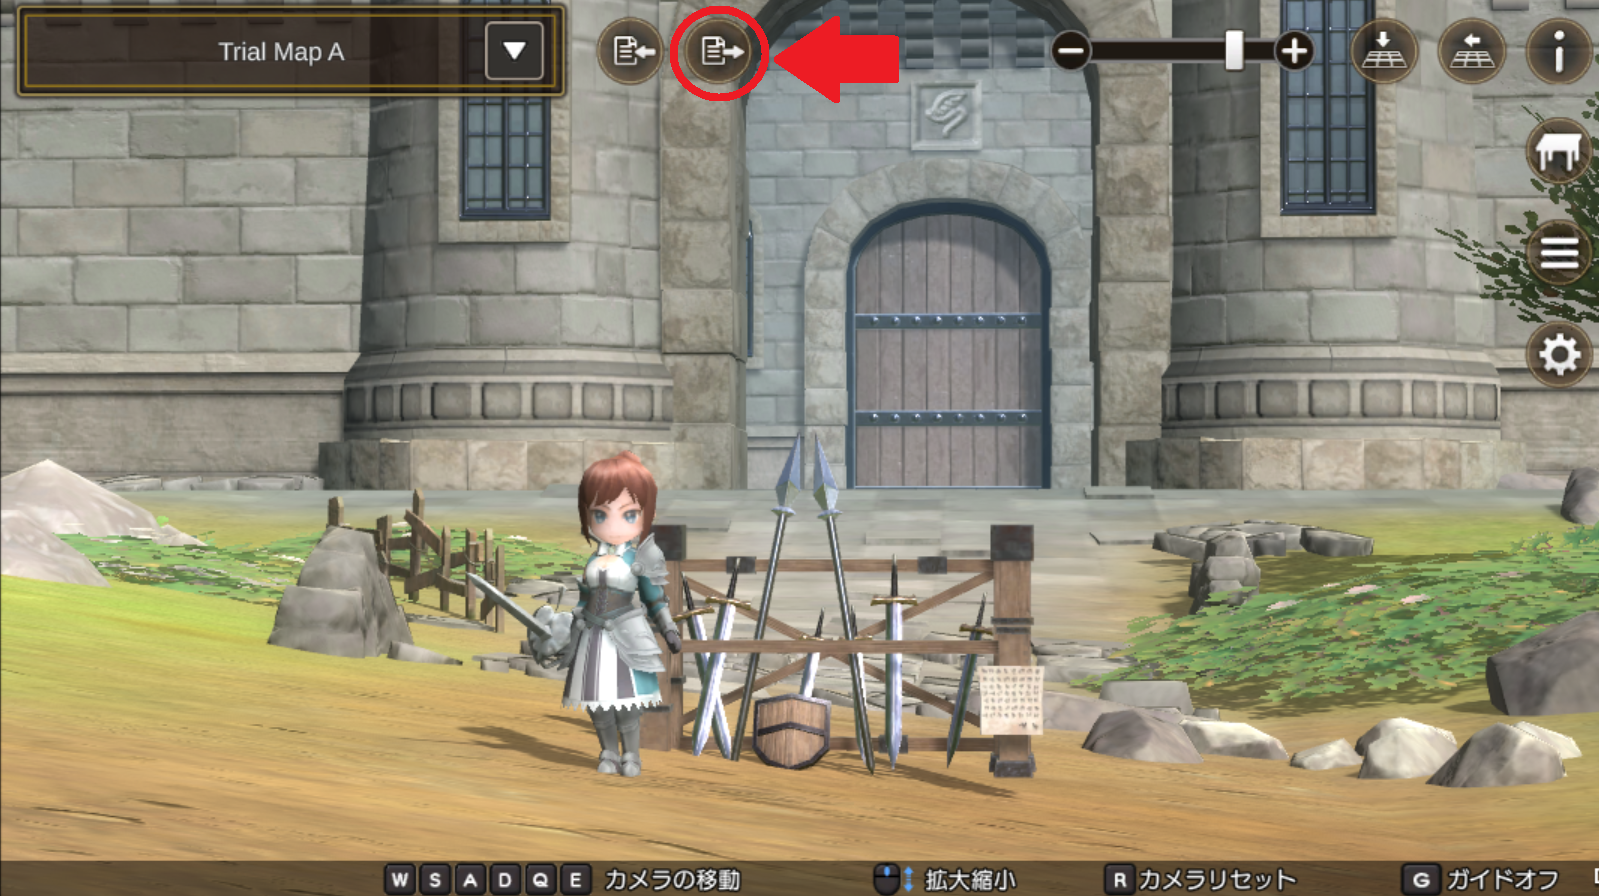
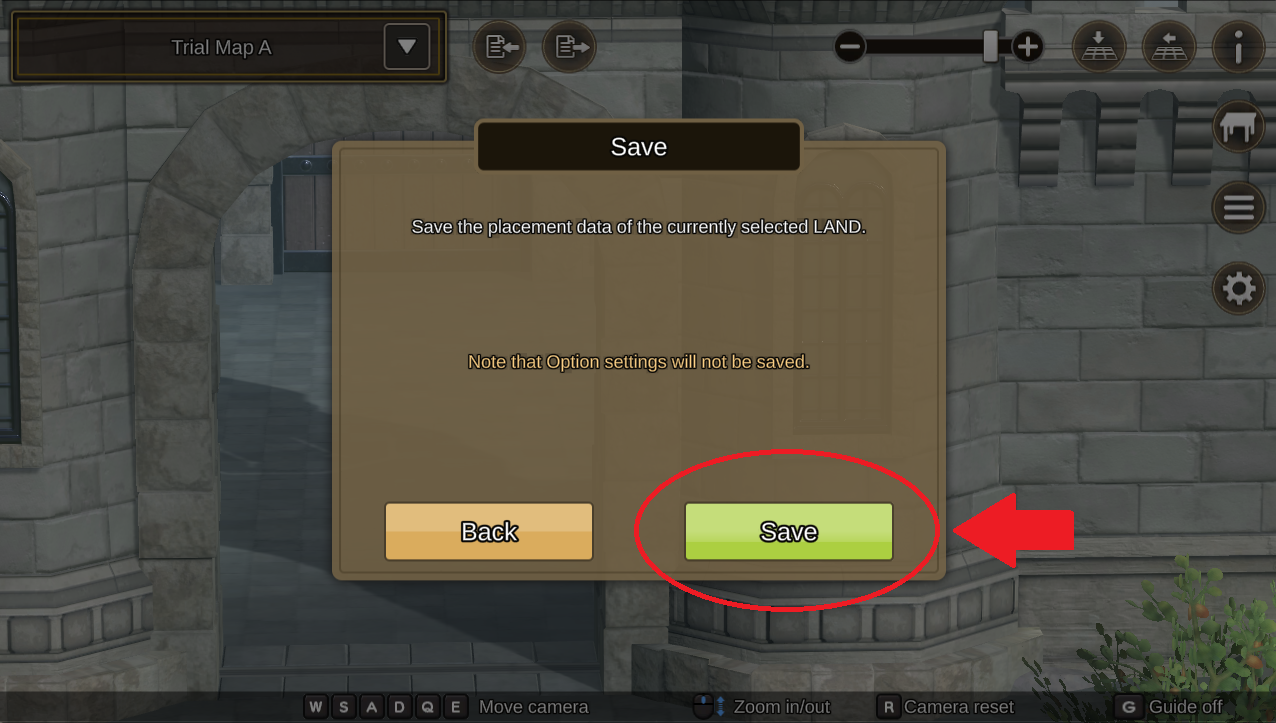
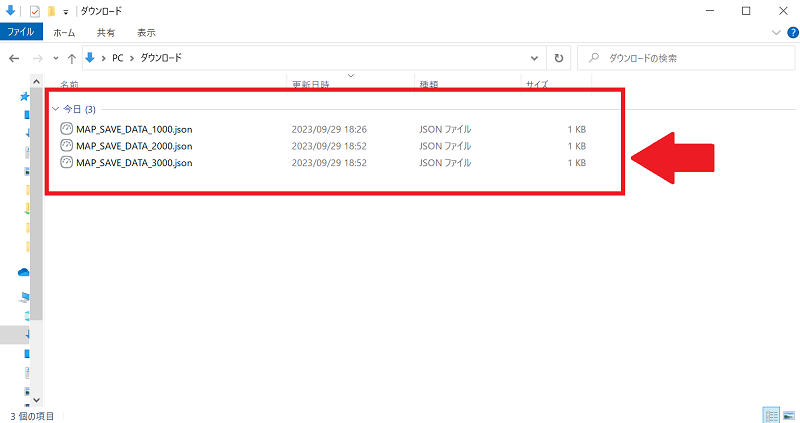
You can save and load your LAND editing data at any time. Saved data is stored as json files in your PC's "Downloads" folder. Even if multiple files are saved, you can choose which data to load. There are two circular shortcut buttons for saving and loading at the top of the screen, so please select "Save" from the right button.
When you click "Save" in the open window, the json file containing the configuration information will be stored in the Downloads folder.
[Basic Controls]
WASD keys: Move the camera forward, backward, left, and right.
EQ keys: Raise and lower the camera.
Note: This camera movement is based on the current camera angle, not parallel to the ground. Mouse wheel: Zoom in and out of the screen.
R key: Reset the camera to the initial position of the LAND.
G key: Hide the guide displayed at the bottom of the screen.
While holding the right mouse button and moving the mouse: Adjust the camera angle.
*The above controls are the default settings. You can customize camera sensitivity, camera control direction and keyboard layout in the Options to your liking.
[Screen Navigation]
■ Arrangement Confirmation Mode
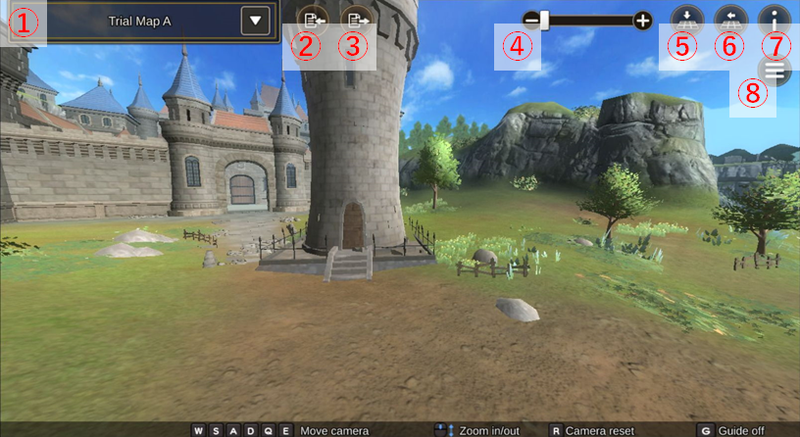
This mode allows you to check the status of placed objects and the LAND.
① LAND Switcher Drop-down:
Use this feature to switch between the LANDs you want to edit.
② Load Shortcut:
Loads the saved LAND editing data.
Ensure to select the save data that was saved for the "currently editing LAND."
*The saved data name includes the name of the edited LAND.
If loading is done on a different LAND from the saved one, the data may not be positioned as expected.
Please do not directly edit exported saved data as it may result in data corruption.
③ Save Shortcut:
Saves the editing data of the LAND.
The save data will be stored in the “Downloads” folder" and will include data for the "currently editing LAND".
④ Zoom bar:
Allows you to zoom in or out of the screen.
⑤ Camera Change (Top View):
Click once to view the LAND from above and click again to return the camera to the LAND initial position.
⑥ Camera Change (Side View):
Click once to move the camera to ground level and click again to return the camera to the LAND initial position.
⑦ Announcements:
Opens a new browser tab displaying the latest information page for GENSO Maker.
⑧ Menu Button:
Arrangement: Switches to the Arrangement mode.
Submit for Review: Button to apply for review for publishing the LAND. Not available in the test version.
Snapshot: Takes a snapshot of the LAND and stores it in the Download folder in your PC.
* By clicking the logo, you can choose whether to insert the GensoKishi logo in the snapshot.
* The camera angle can be reset using the Camera Reset feature.
Save/Load: Saves and loads the Land editing data. The operation is the same as the shortcuts.
Options: Allows you to changes the “Language”, “Camera settings” and “Keyboard”.
■ Arrangement Mode: When no object is selected
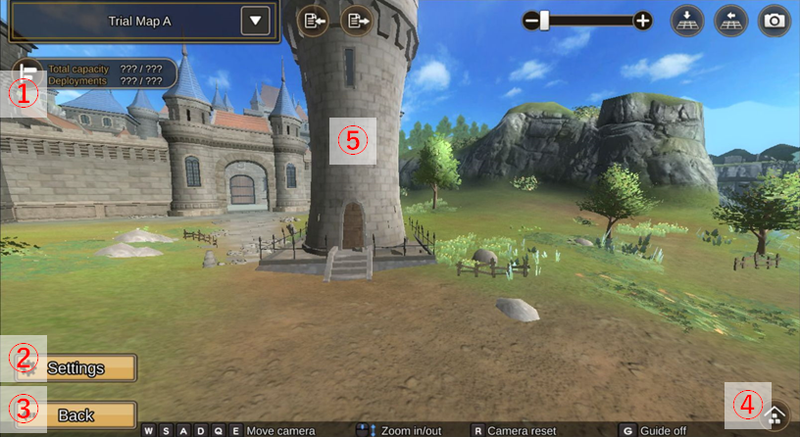
This mode allows you to place objects on the LAND.
When you haven't selected any objects, the screen will appear as shown above.
① Number/Capacity of placed items Button:
This will show you the list of placed objects and their respective capacities.
In the test version, there are no limits on the number of objects or their capacities, so they will be displayed as "???"
・Up to 100 objects can be placed for each type.
・Note: The performance may become slower as the number of placed objects increases.
② Settings Button:
This will allow you to configure settings when entering the LAND.
Prohibited entry : Specifies areas where characters cannot walk.
*This feature is not available in the test version, as entry into the LAND is not allowed.
Music: Sets the music that plays when entering the LAND or during object placement.
*In the test version, you can set the music that plays during placement.
③ Back Button:
Exits the arrangement mode and returns to the arrangement confirmation mode.
④ Object List:
This will show you the list of your objects.
⑤ Placed Objects:
Clicking on a configured object allows you to edit the object.
Note: It may not be easy to select objects accurately when they overlap or due to their size.
■Arrangement Mode: When objects are selected
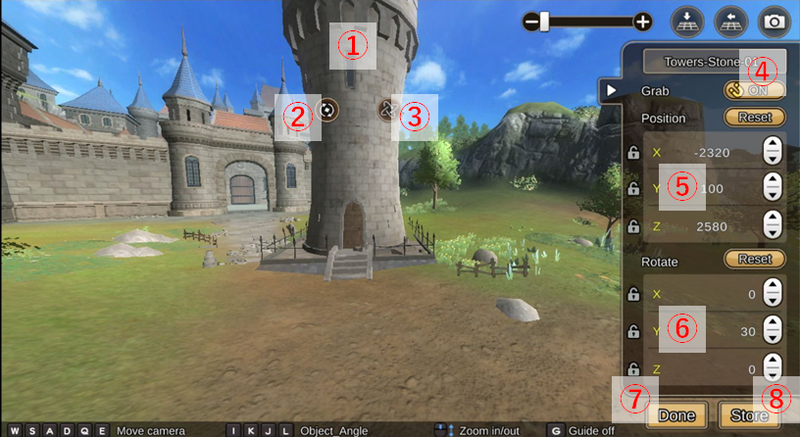
This mode is displayed when an object is selected from the object list or when clicking an object in arrangement mode.
In this mode, you can freely rotate and move objects.
[Object Arrangement]
After selecting an object from the object list, the object will appear on the ground in the direction you are currently facing. Please note that if the camera is embedded in the ground or looking up at the sky, or the camera focus is set far away, the object may appear in a place where you don't intend to display it, or it may not be possible to place it.
Additionally, the objects cannot be directly placed outside the editing area of the LAND (However, you can place objects elsewhere and then move them).
In the test version, the ground areas serve as the editing area.
*Note: Even in areas with ground, the objects cannot be placed directly in extremely high/low positions.
① Objects:
You can move objects by dragging the mouse.
This movement can be restricted by the Settings of "Snap Position (④)" and "Object Position (⑤)".
② Vertical Axis Fixed Rotation Button:
③ Free Rotation Button:
Clicking and holding either of these buttons while dragging the mouse allows you to rotate objects.
Vertical Axis Rotation Button (②) enables rotation around a fixed axis in the center, and Free Rotation Button (③) allows free rotation.
This movement can be restricted by the settings of "Grab(④)” and "Rotation(⑥)”.
If "Alignment Position" (④) is set to ON, the object can only rotate at certain angles and requires significant mouse movement.
When the "Grab" is set to OFF, you can rotate objects precisely.
④ Grab:
This is a mode for assisting object placement, allowing rotation and movement of objects in specific units.
By default, it is set to ON, and you can switch it ON/OFF with a click.
⑤ Object Position:
Displays the position coordinates of the object.
X and Z represent the horizontal position, and Y represents the vertical position.
You can change these values using arrows or by directly inputting them.
Clicking the key icon allows you to lock any desired coordinate values. (For example, fixing Y enable parallel movement without changing the height)
Clicking the reset button restores the object's position to its original configuration state before selection.
⑥ Rotate Button:
The rotation angle of the object is displayed in numbers.
You can input the angle using the same method as the Object Position.
Clicking the reset button will set the object's angle back to 0."配置
⑦ Arrangement:
Places the currently selected object.収納
⑧ Store:
Stores the currently selected object.
[GENSO Maker(Test Version) Precautions]
・In the test version, data recovery of placement is not available. We highly recommend saving your configuration data regularly during use.
・Clearing the browser cache may cause the initialized state of data, including placed objects. Before clearing the browser cache, please ensure that you have saved your data.
・Please be aware that performing the "Clear data" operation for "Cookies and site data" in Google Chrome will reset all maps to their initial state with no objects placed.
・Please note that the performance may become significantly slower depending on your system environments as the number of placed objects increases.
・Please be aware that editing saved data contents or loading data in maps where the data was not originally saved may lead to data corruption.
The operation methods and data in the test version are provisional and subject to adjustments and changes in the future. Significant updates are also being prepared for the official version.
Your feedback are highly appreciated as we value your input!
Please feel free to submit your feedback and requests through this contact form.: https://genso.game/en/contact/
◆ Gensokishi Online -META WORLD- Community
Official Site : https://genso.game/
Twitter : https://twitter.com/genso_meta
Discord : https://discord.gg/gensometaverse
LINE : https://lin.ee/fRx2vvE
Telegram(English) : https://t.me/gensometamain
Telegram(Chinese text) : https://t.me/gensometazw
Telegram(Japanese) : https://t.me/gensometajpn
YouTube:https://www.youtube.com/channel/UCMi4wGMEWgC9VVps8d_NLDA